Bring Your Sketches to Life with Simple Shading and Shadow
Hand-sketching plays an essential role in design and innovation. Sketches are generally the first visual representation of an idea, and hand sketching is often the main tool for concept ideation and exploration. Many innovators, including me, use sketching as a way to think about the problem and the solution simultaneously. For example, in the image below, I worked through various forms for a backpacking lantern, while at the same time thinking about what it needed to do (how it will be turned on, how it might hang from a string, or stand up on a table, and even how light might project from the transparent parts of the lantern). I can think of no faster way than hand sketching to explore through a large variety of concepts.

Simple exploratory sketches for backpacking lantern. This is a 20 minute sketch.
Hand sketching is equally valuable when working through the mechanical functionality and sizes of parts as I have done with this scratch paper sketch of an air engine, below. These are just a few examples of how sketching is essential to design and innovation.

Scratch paper sketch used to workout basic shapes and sizes of a 3D printed compressed air engine.

3D printed engine, designed and built after making various hand sketches including the sketches shown above.
While sketching, designers often use shading, shadows, and various weight lines to bring the idea to life and make it stand out on the page. The purpose of this article is to introduce a number of common techniques ranging from simple to mildly complex that will make your sketches look more realistic and get more attention among the many ideas that may be in consideration.
Why take time to add shading and shadowing to sketches?
Shading and shadowing give your sketches depth, context, and a greater sense of realism. Below, for example, is a plastic case that opens along the red line, and locks with the orange latch. The image shown on the left is the basic shape. The image shown on the right is the same shape, but it has depth because of the shading, and context (sitting on a table) because of the subtle black shadow under it.
When sharing your ideas with others, or trying to convince them that the idea is worth pursuing, understand that the image on the right is easier to absorb, contextualize, and envision as a real product. Also understand that the work to transition from the image on the left to the image on right is not difficult when thinking about the light source and how it interacts with the object.

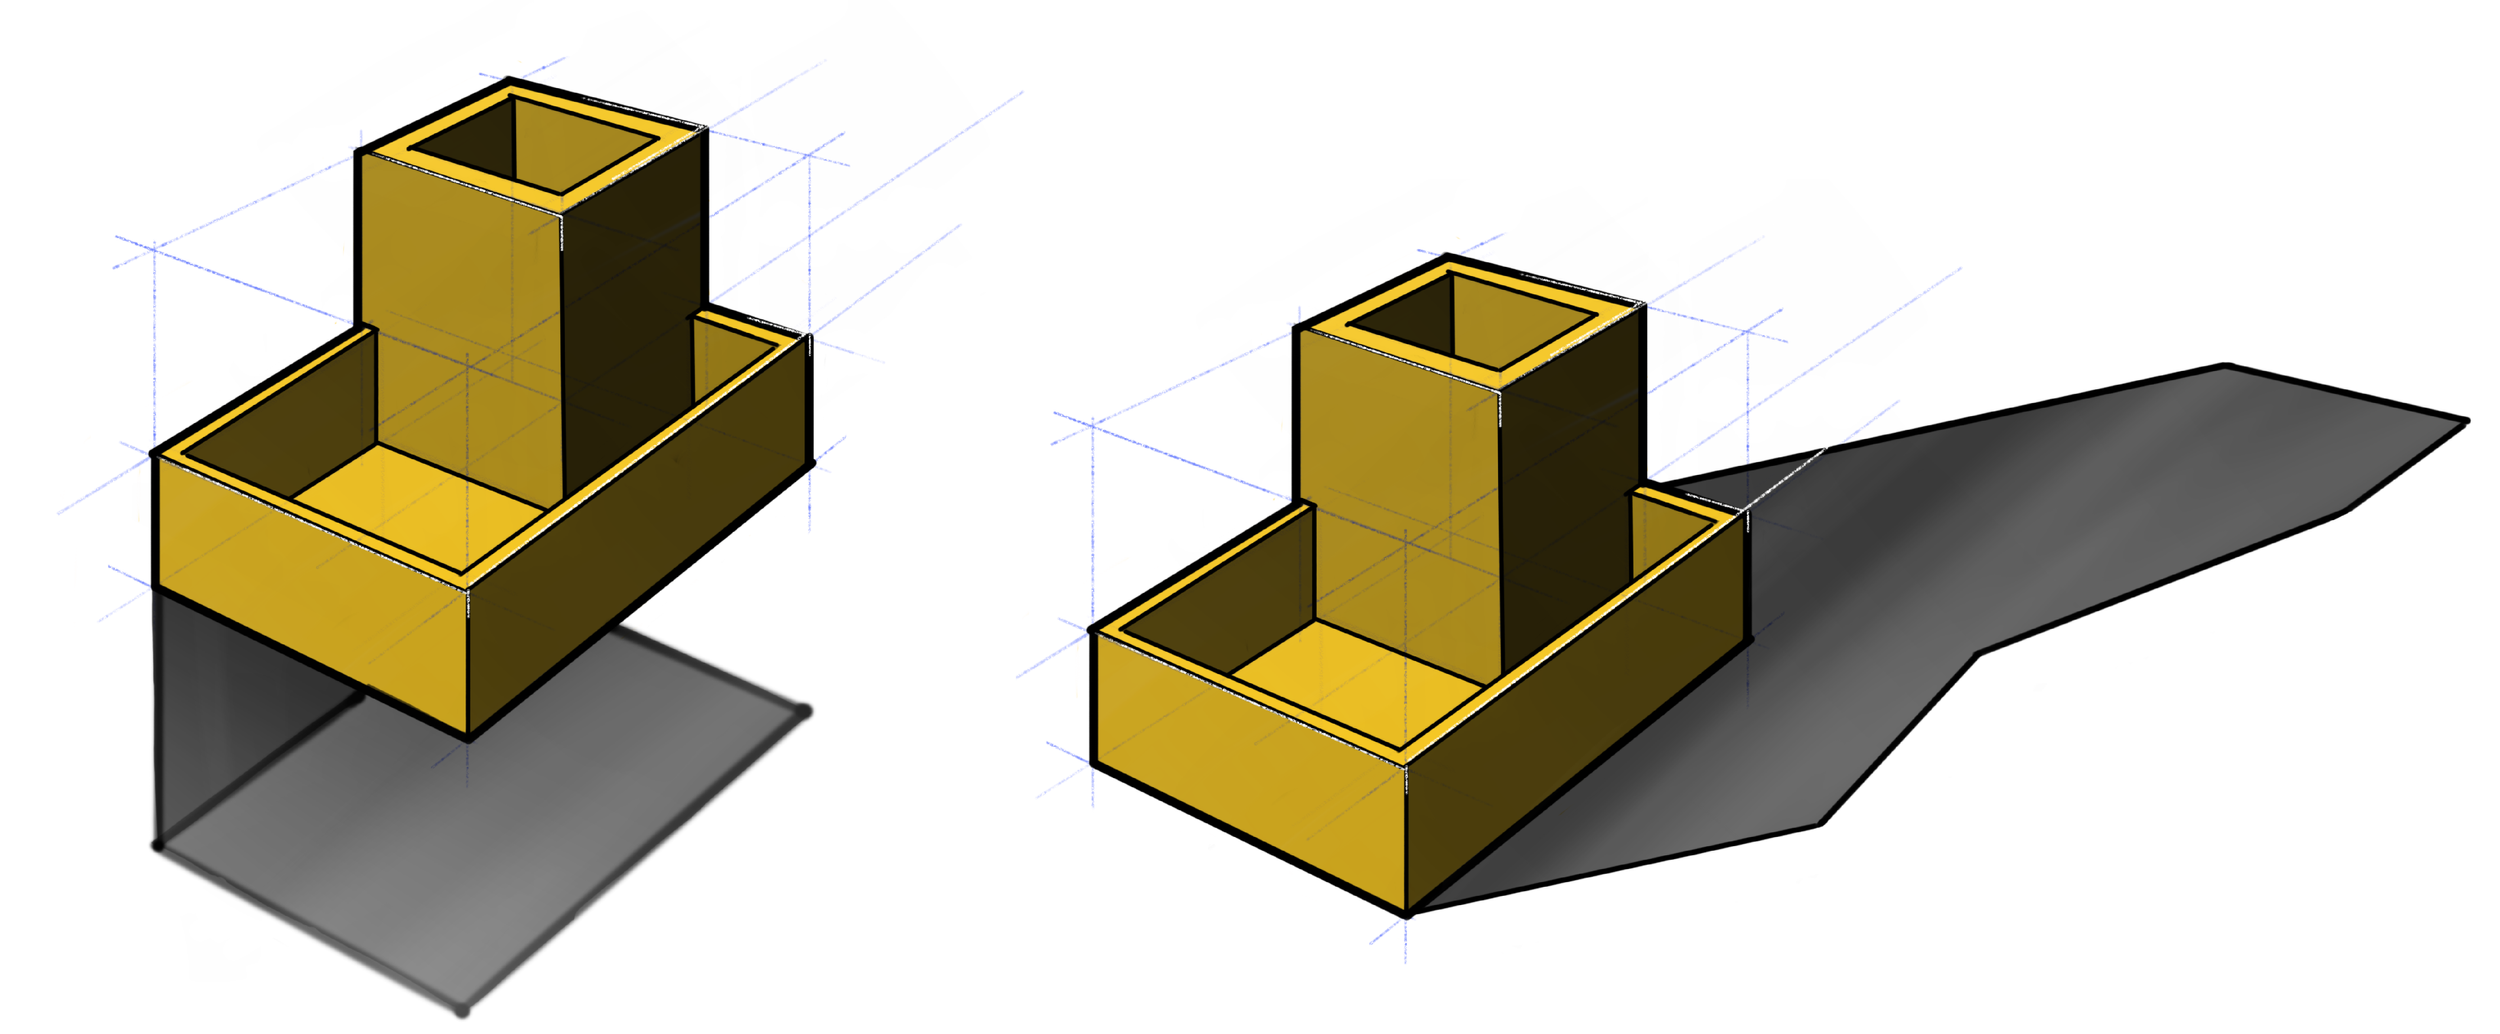
Shadows also help to indicate how the object is situated in the world, as illustrated by the two identical yellow objects shown below. The shadows indicate that one is attached to a wall, while the other sits on a flat table.
The Process of Sketching
Sketching takes practice and time. If you want sketching to be a valuable tool in your tool box, you’ll need to learn how to use it. If you feel discouraged about your ability, it is likely helpful to remember the first time you used a screwdriver or a hammer, and that it was unnatural and difficult, but quickly became doable with practice. Sketching is the same. Our 4 part course on sketching is a great place to start [2-6], and it requires only 10 minutes of sketching per day. Surely you can afford that.
Learn to Sketch Part 1
Learn to Sketch Part 2
Learn to Sketch Part 3
Learn to Sketch Part 4
Learn to Sketch: Shading and Shadowing Cylinders
The process of sketching, as taught by BYU industrial design professor Paul Skaggs, has three steps, which are illustrated below [1].

Add Shading and Shadowing
To give your sketch depth, transition away from the uniform line weights shown directly above (in blue), and add shading as shown below.

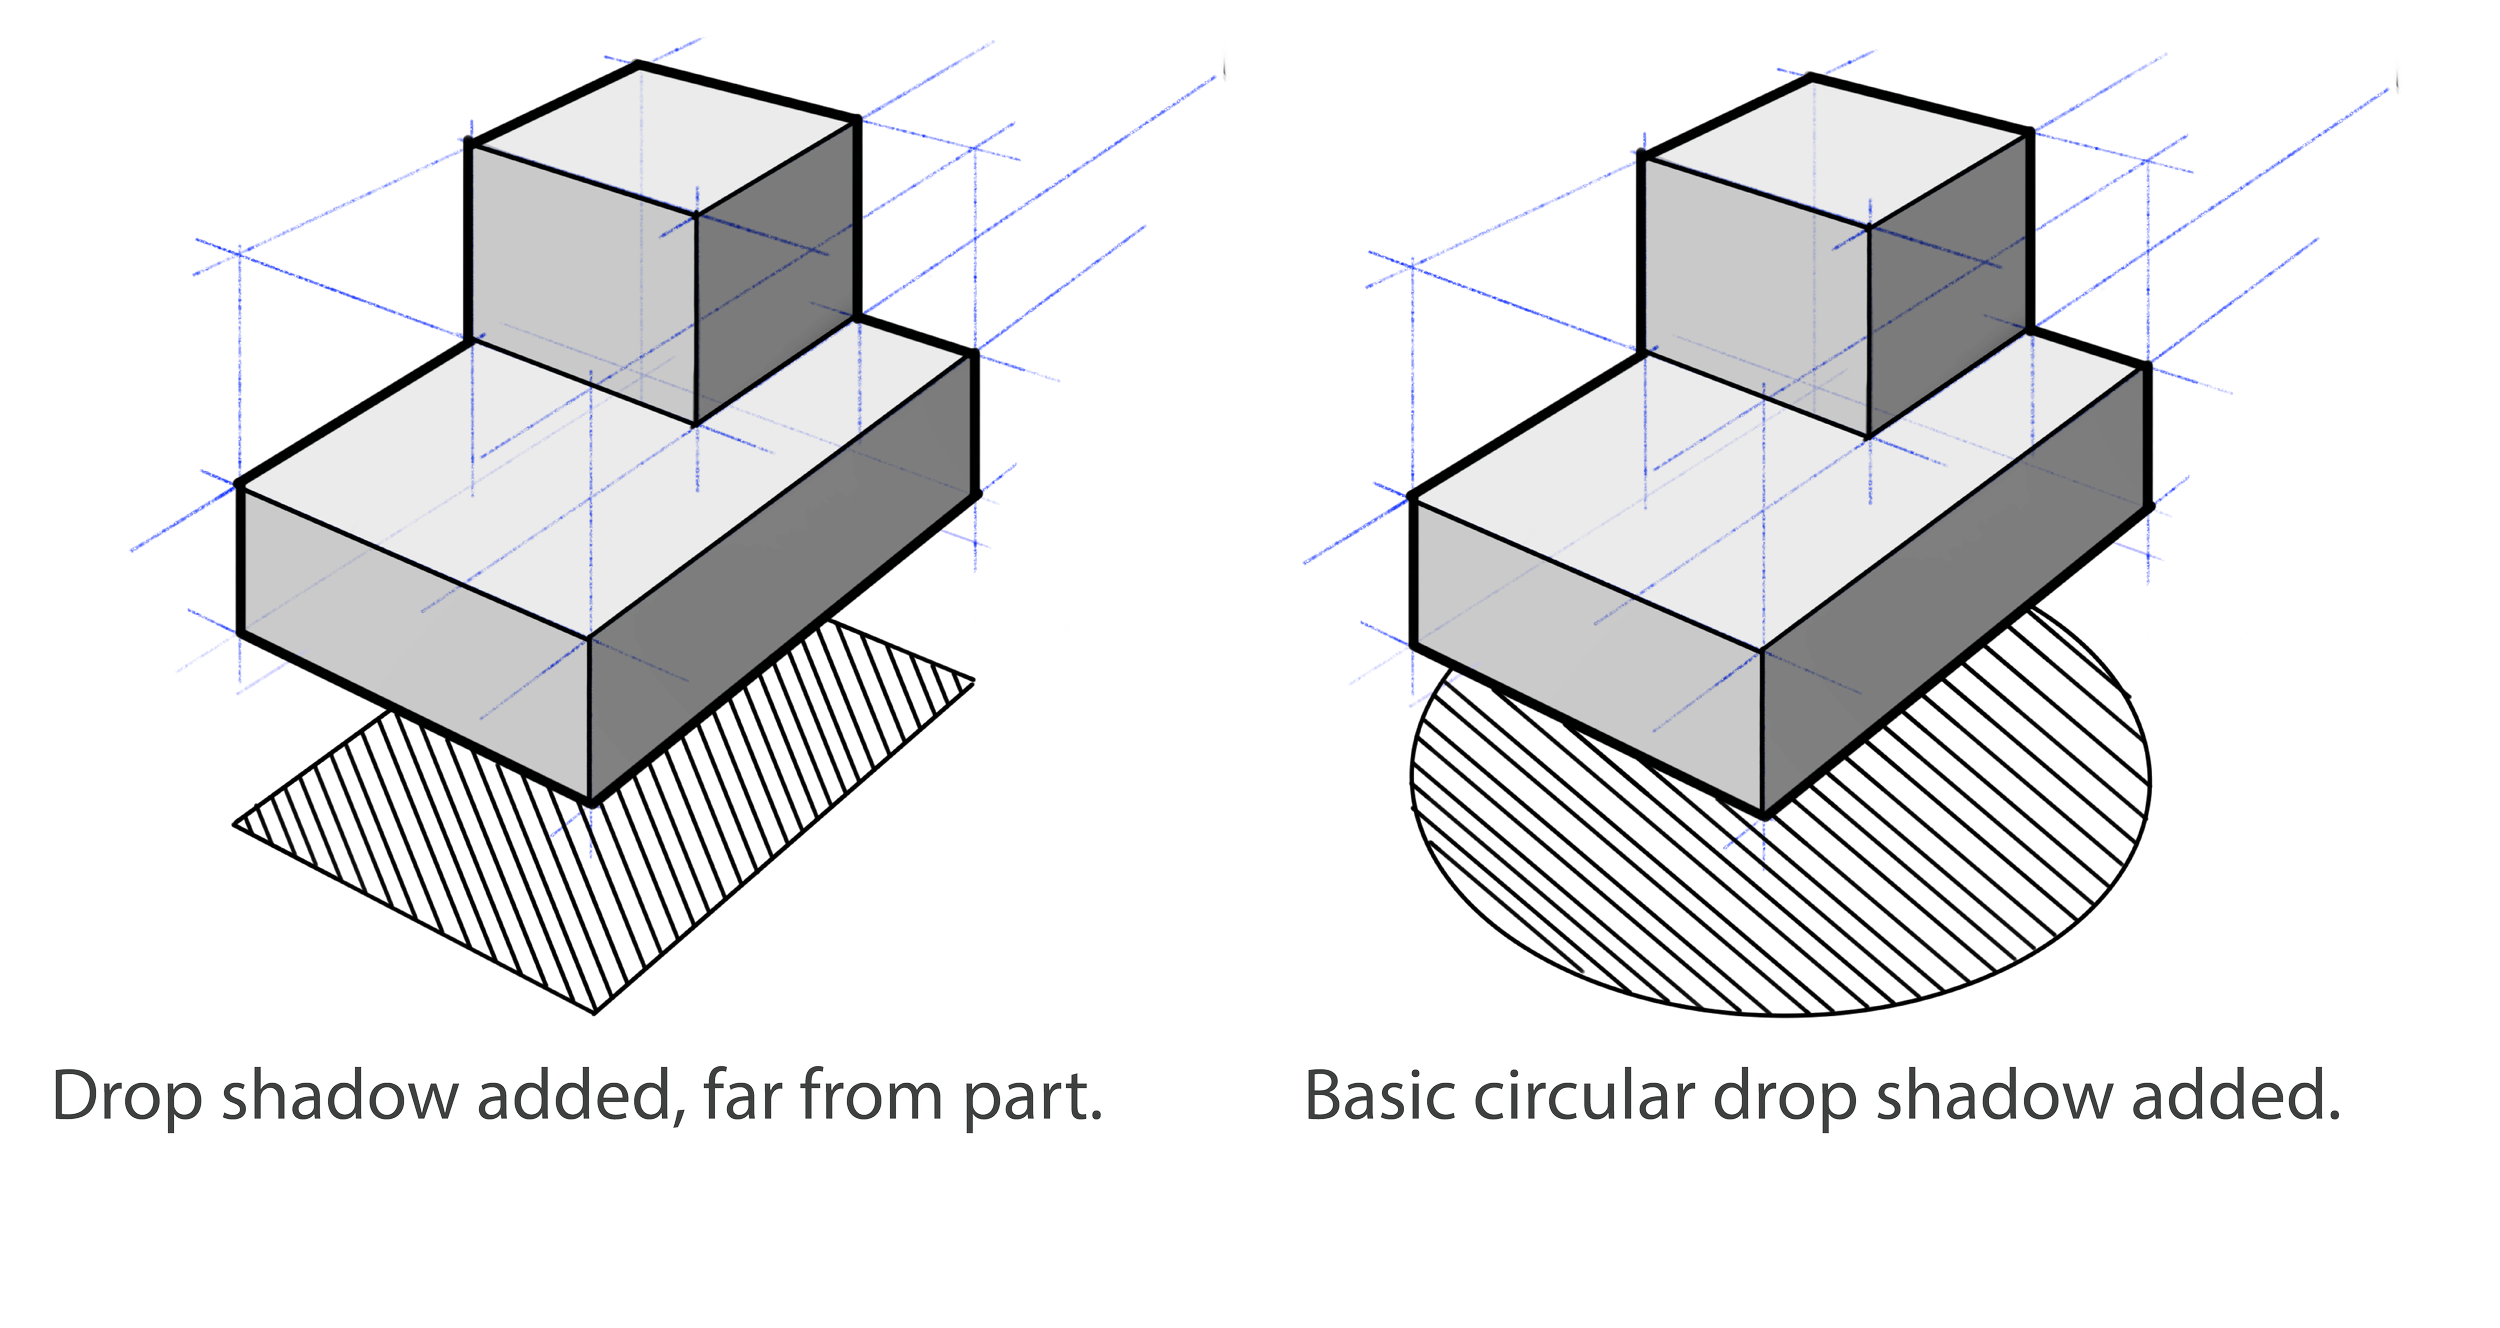
There are various approaches to adding shadowing. The simplest is a drop shadow, as shown below. Various versions of drop shadows are used and are available for you to try.


Adding Cast Shadows
A more complex approach to shadowing is the cast shadow. Ultimately, with practice, you’ll be able to draw a quick and dirty cast shadow in a few seconds as I did directly below. Learning to do that well is facilitated by learning a precise method for casting shadows, which is taught below.


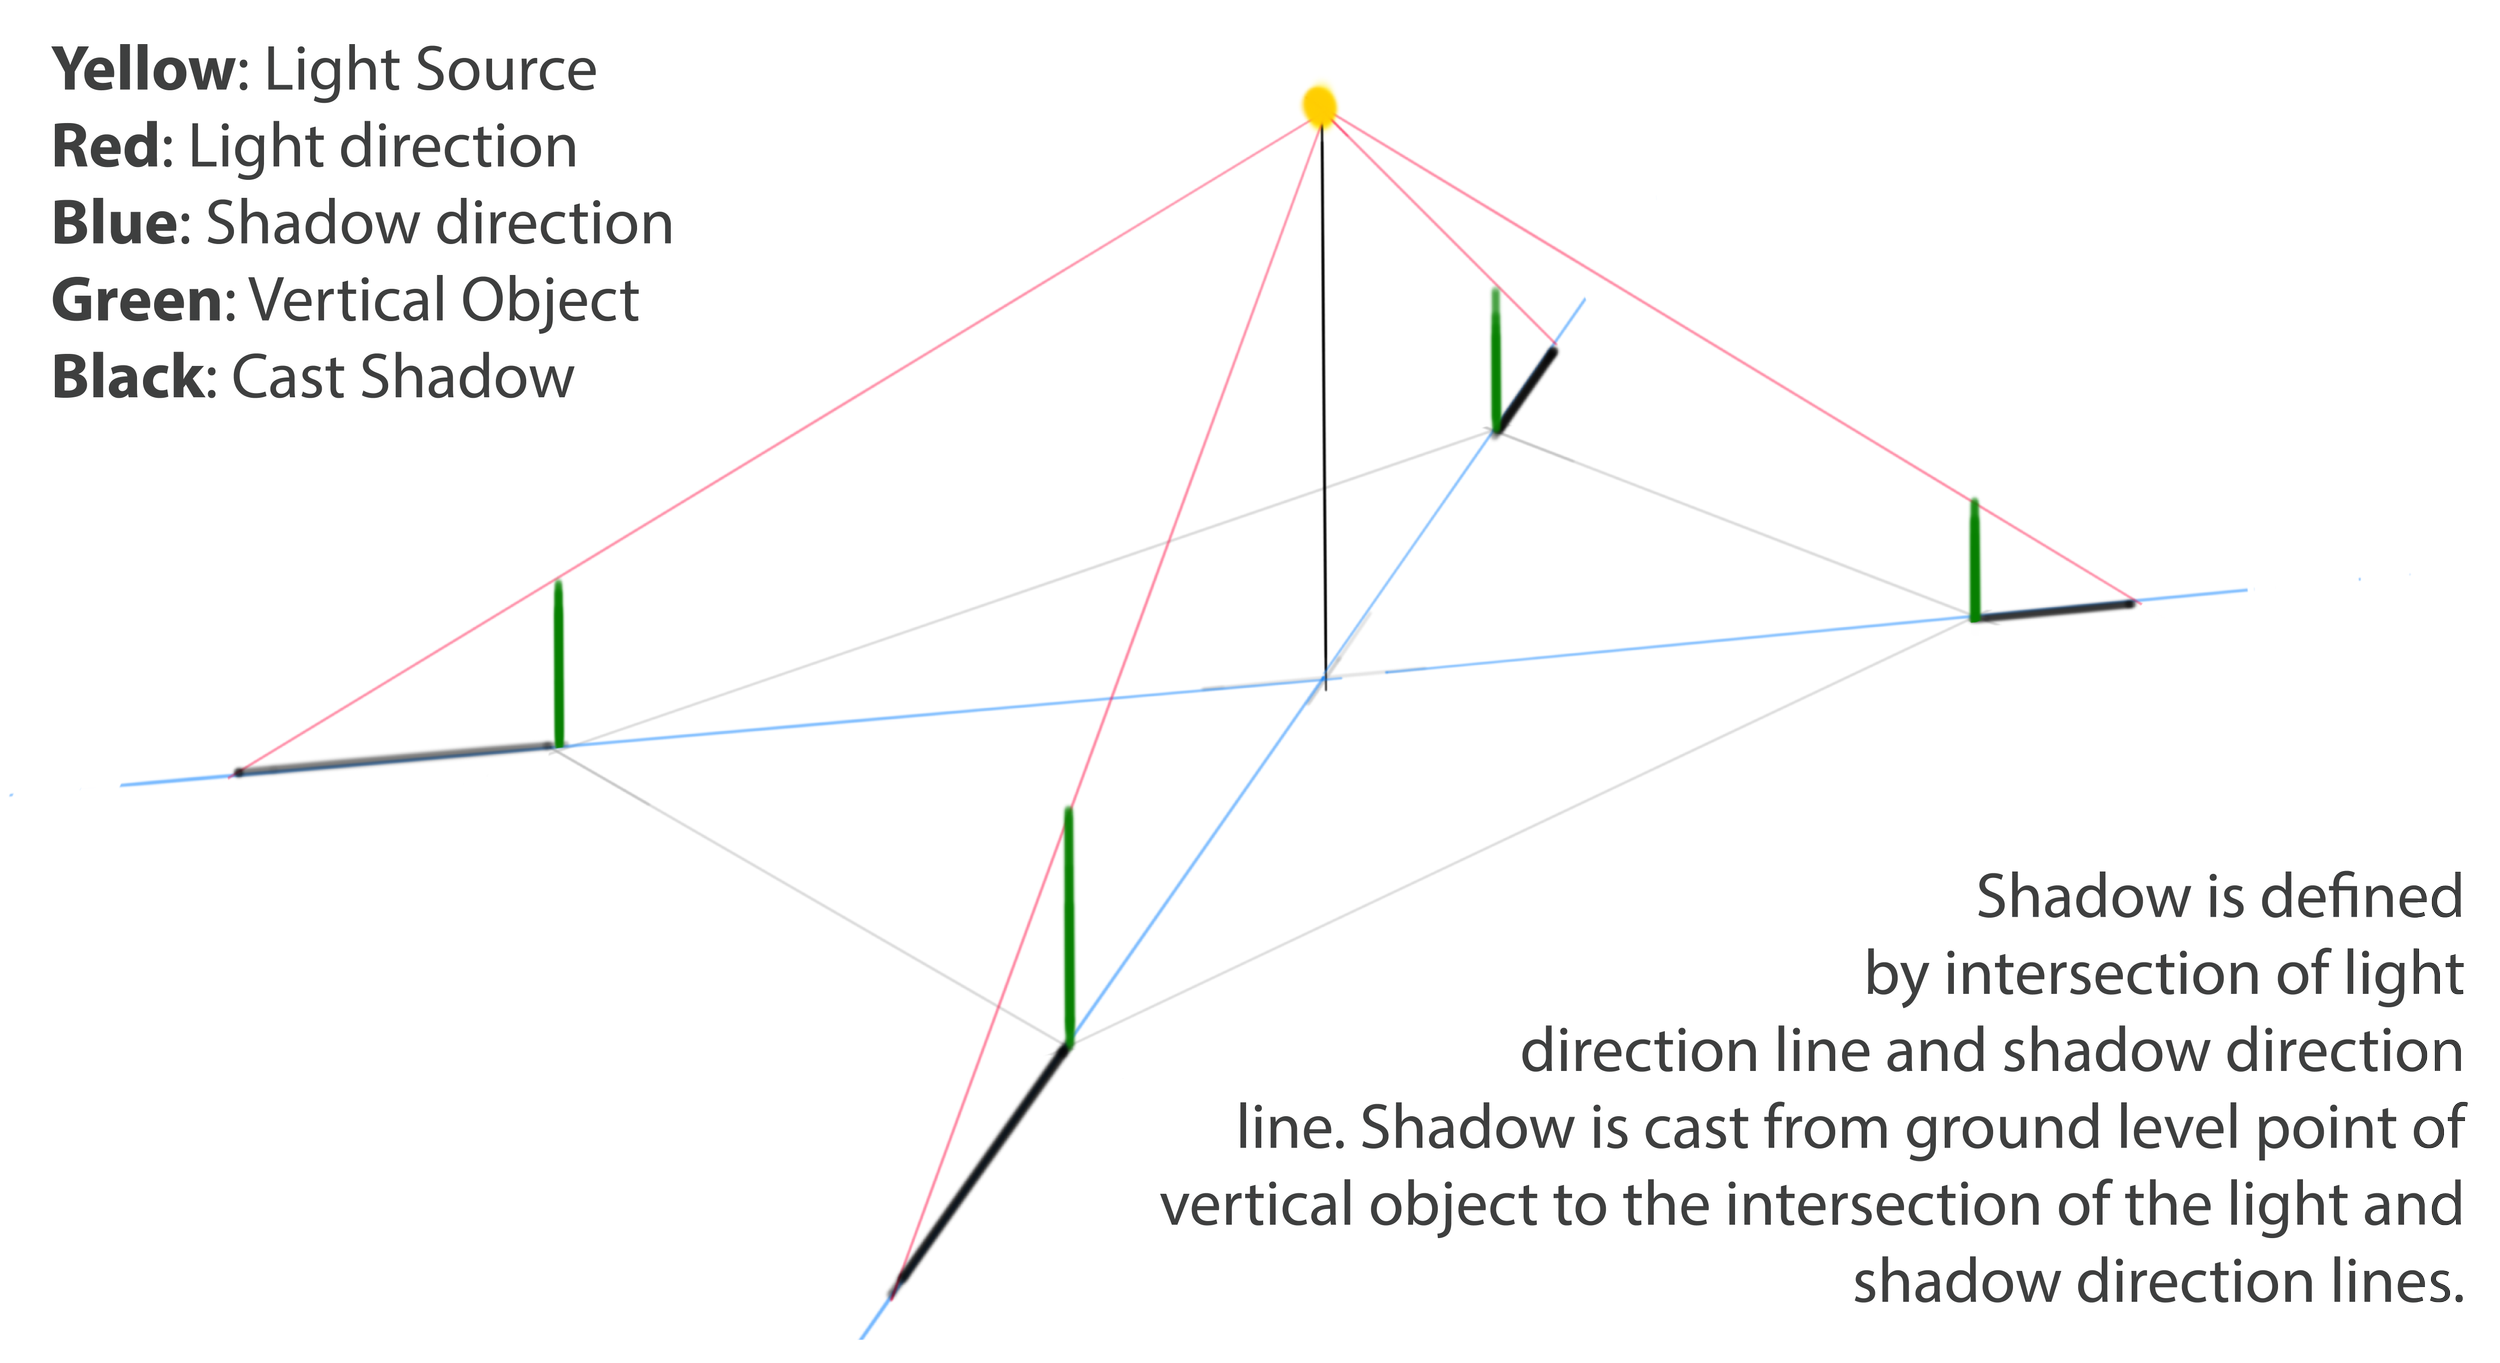
Cast Shadow Principles
To make a precise cast shadow, understand the principles shown in the figure directly below. Here, four green sticks are shown as vertical objects. A light source is shown at a specific location. From the light source we can see red lines; this is the light direction as it passes by the top of each vertical stick. Also seen are blue lines, this is the direction the shadow will follow. Blue lines are made by projecting the light source to the ground directly below it, then drawing a line from that point through the bottom of the stick. The shadow begins at the bottom of the stick, and continues until the point where the red line and blue line intersect. This is the cast shadow. To help establish the horizontal plane upon which the sticks are situated, I have sketched a rectangle and put a stick (of arbitrary height) at each corner.
To better understand these principles, I suggest making a similar sketch to that shown below.
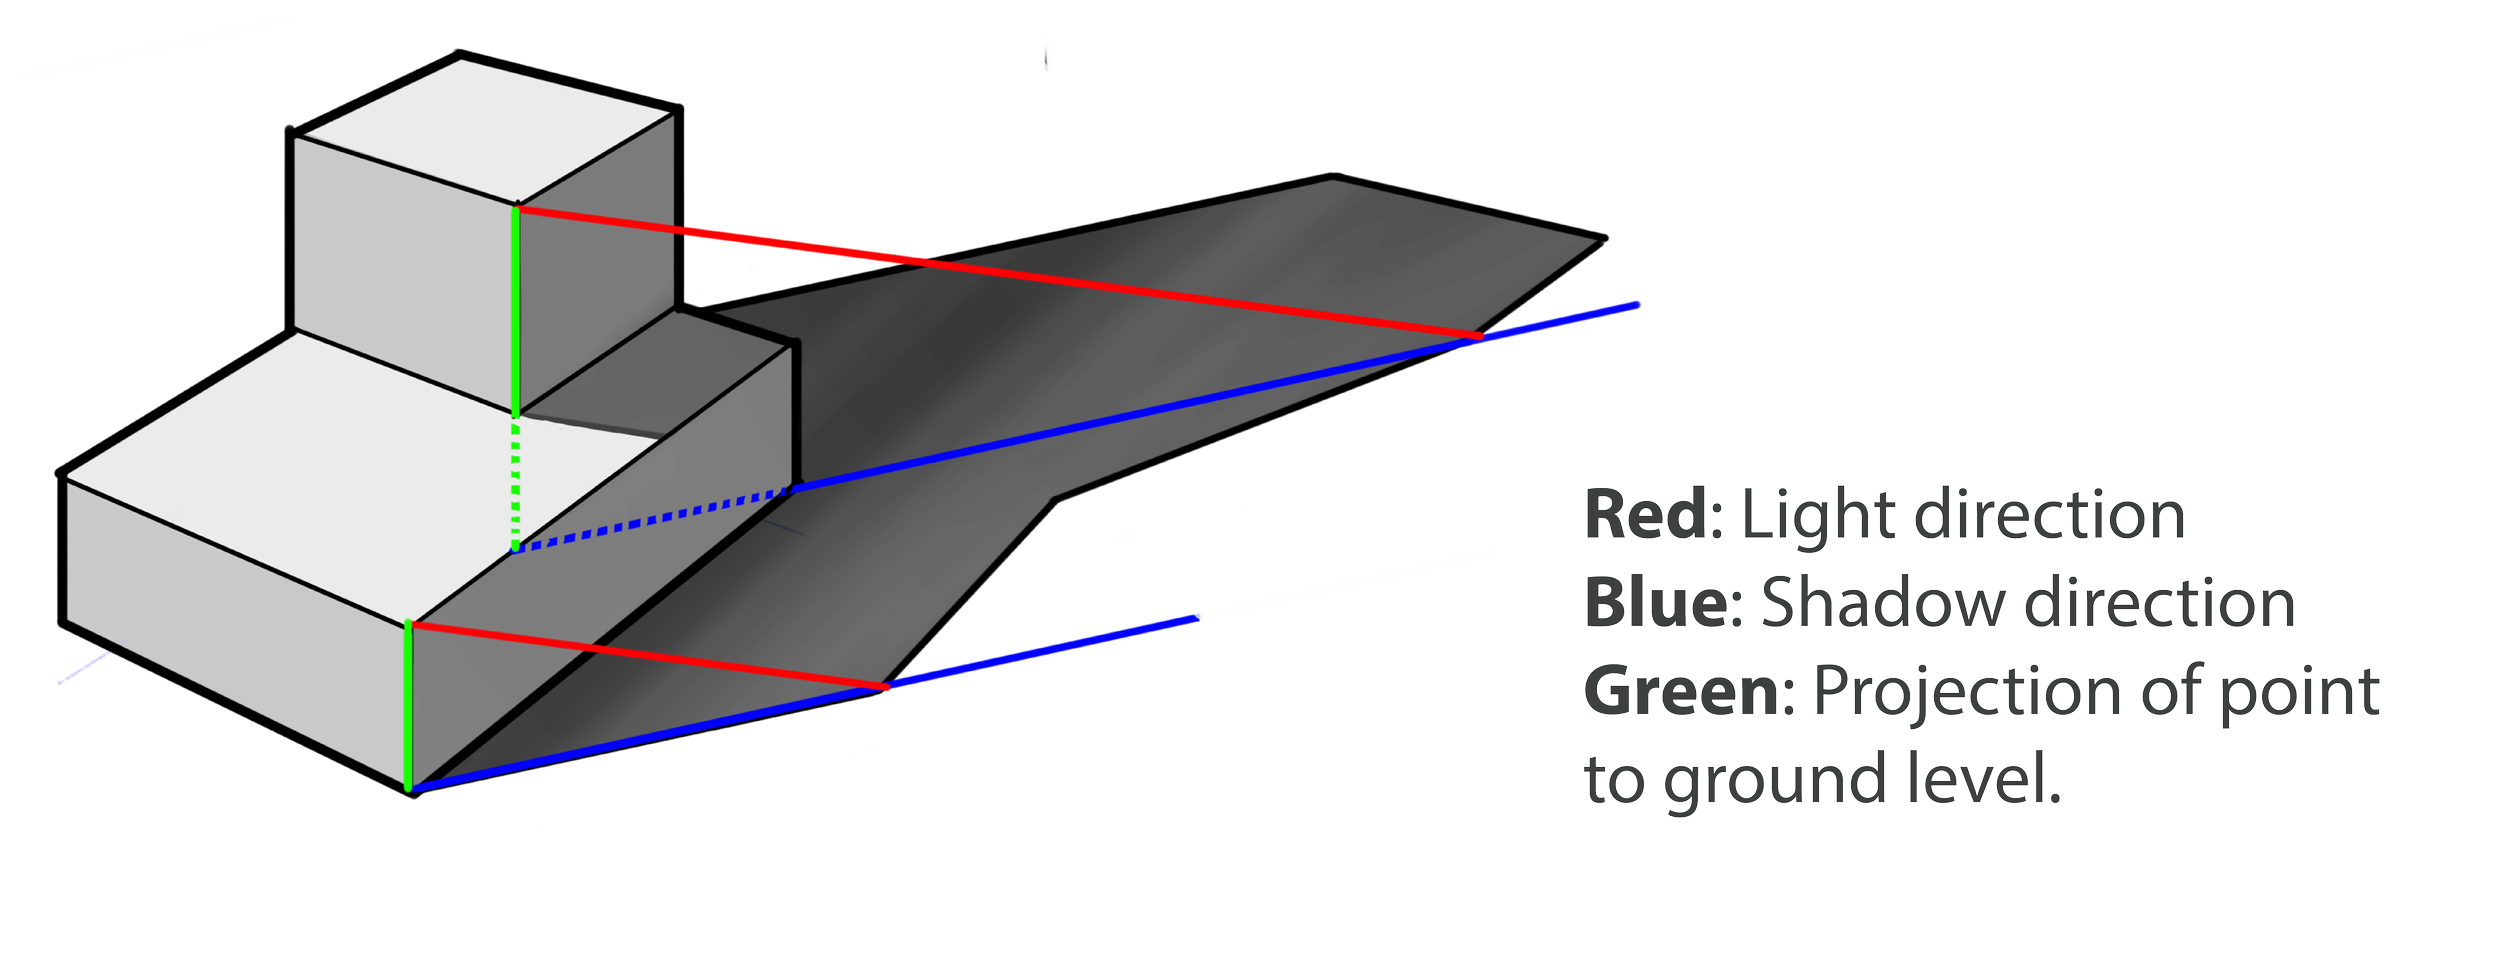
The shadow casting principles apply to non-stick objects as shown below. A light source location is imagined in front of and to the left of the object. Then blue and red lines are sketched. For a light source that is far from the object, it is appropriate to make all red lines parallel to each other, and all blue lines parallel to each other.

Various Shading/Showdowing Examples
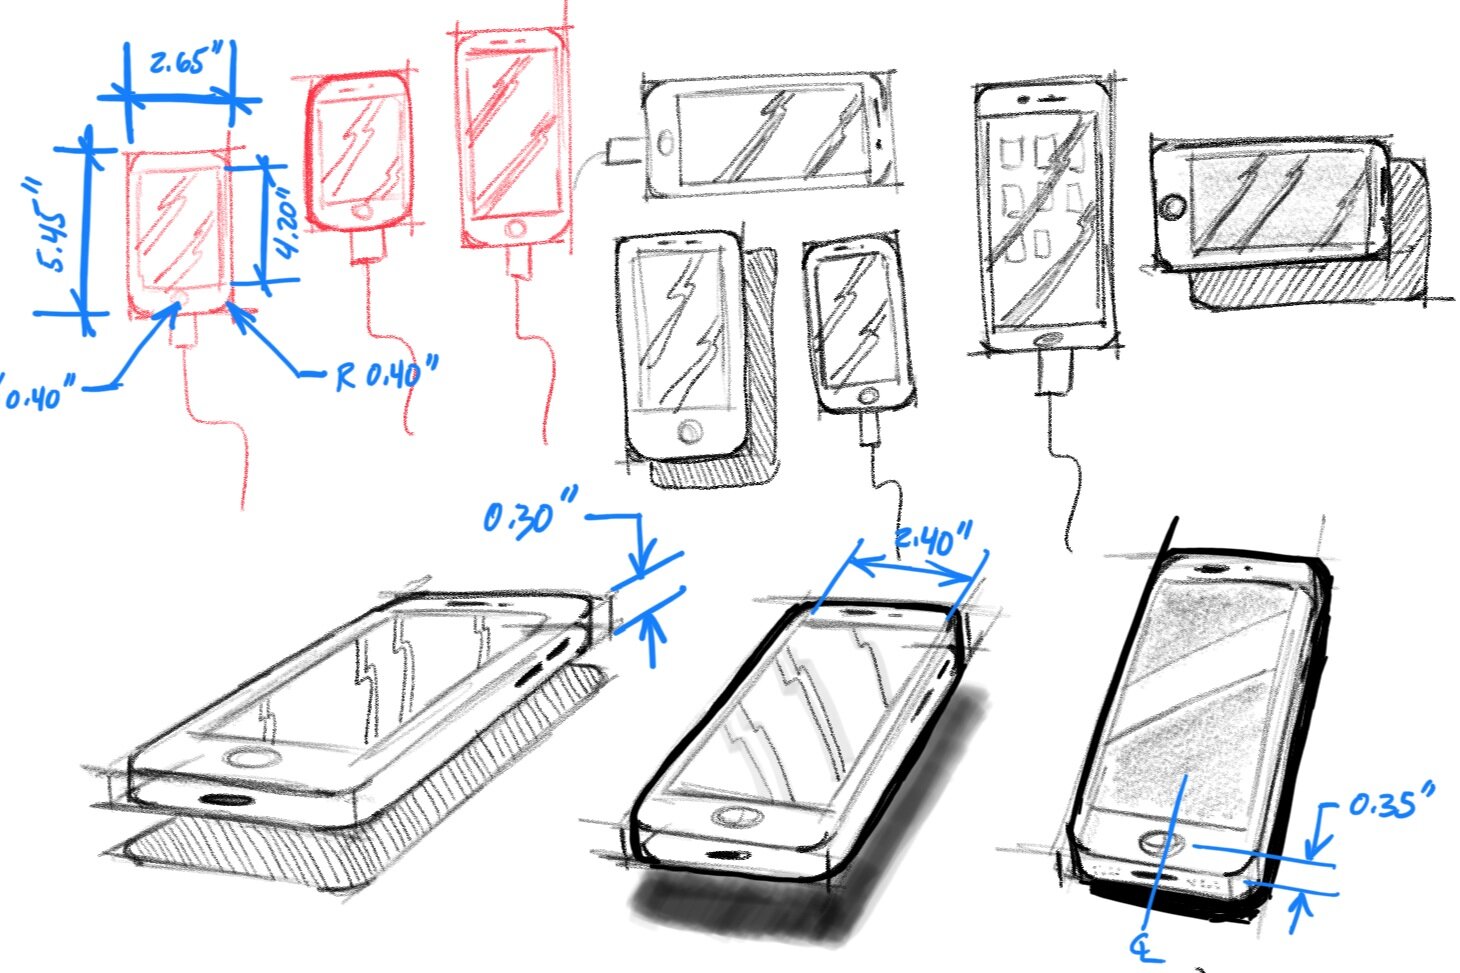
Below are various examples of the plastic case. Try to pick up on the small differences between the sketches. For example, directly below note the white highlight added to the edge of the orange lock.

In the image of the flashlight below, notice that the drop shadow does not even attempt to match the profile of the flashlight. This is a normal and acceptable approach for product design sketches. Such drop shadows are extremely simple to do.

When making shadows for transparent parts, such as the bottle shown below, the internal parts of the object can also appear in the shadow and even transmit some color with it.
The above images are hand sketched on a tablet so that various options could be shown and intermediate steps indicated. Below is one version of what a non-tablet hand sketch might look like when using just a ball point pen. It should be noted that the images shown above could be made without a tablet using markers, and they would have been indistinguishable from the tablet-drawn cases.

Practice
To practice adding shadows and shading to your sketches, try reproducing the shapes presented in this article. Or consider trying the simple shapes shown below.


Final Thoughts
Sketching is an amazing tool for designers, innovators, and engineers. It’s worth learning to do, and not terribly difficult once you learn the principles. This article showed various ways to add shading and shadowing to a sketch. All of these approaches can be practiced with a simple cube. As you move forward, have confidence knowing that sketching is learnable, it is worth learning, and that with consistent practice (even 10 minutes a day) you will create sketches that you and others admire in just a few months.
References
[1] P. Skaggs, R. Fry, Visualization Methods, INDES133 Course Materials, BYU Academic Publishing, ISBN978-0-74093-242-7, August 2011.
[2] C. Mattson, “Learn to Sketch Part 1” https://www.designreview.byu.edu/collections/learn-to-sketch-part-1, accessed 12 Jan 2024.
[3] C. Mattson, “Learn to Sketch Part 2” https://www.designreview.byu.edu/collections/learn-to-sketch-part-2, accessed 12 Jan 2024.
[4] C. Mattson, “Learn to Sketch Part 3” https://www.designreview.byu.edu/collections/learn-to-sketch-part-3, accessed 12 Jan 2024.
[5] C. Mattson, “Learn to Sketch Part 4” https://www.designreview.byu.edu/collections/learn-to-sketch-part-4, accessed 12 Jan 2024.
[6] C. Mattson, “Learn to Sketch: Shading and Shadowing Cylinders” https://www.designreview.byu.edu/collections/learn-to-sketch-shading-and-shadowing-cylinders, accessed 12 Jan 2024.
To cite this article:
Mattson, Chris. “Bring Your Sketches to Life with Simple Shading and Shadow.” The BYU Design Review, 12 Jan. 2024, https://www.designreview.byu.edu/collections/bring-your-sketches-to-life-with-simple-shading-and-shadows.